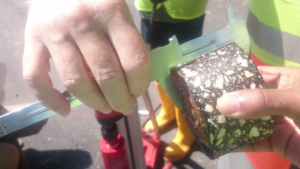
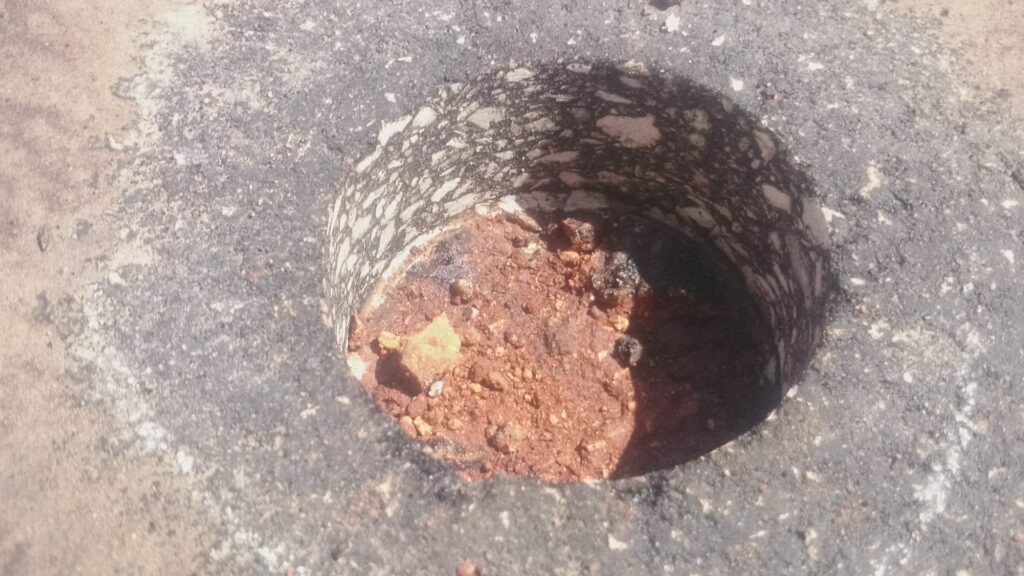
In Road Construction Projects, engineers carry out Asphalt core testing to confirm the quality of the works like the density of the asphalt, the thickness of the layer, air permeability, asphalt compression strength, asphalt mix test, etc. The below video shows the procedures to take the core sample or specimen and measure the specimen’s depth to determine the depth of Asphalt Pavement. This procedure is also known as the Asphalt core test. Further, this test could be carried out in remote areas so the electricity arrangement could become an important factor before planning the test so that the power source could be part of the equipment set.
In this blog, we will see the procedure or the method of testing the Asphalt Layer Thickness.
Scope:-
In this method statement, showing the steps shall be carried out to take the core of asphalt using the core drill machine and measure the core’s depth or thickness using Vernier Caliper.
Referenced Document:-
- AASHTO / TBS (Tanzania Buro of Standard)
- Project Specification
Significance and Use:-
Sample taken following the procedure may be used for measuring pavement thickness, compaction, porosity etc; additional testing may be performed as required by the authority.
Tools & Equipment:-
- Diamond coring tool – Hilti DD 200
- 100mm Dia. Core bit.
- Power supply unit
- Water supply unit – Hilti DWP 10
- Vernier Caliper
Material:-
- Water as a Cooling Agent
Test Sight Location:-
The numbers of cores obtained shall be determined by the test procedure, project specification or authority requirement, and the authority shall determine the core location.
Precautions need to be taken while coring.
- Coring proceduce should be done in the morning time while the ambient temperature is low.
- The coring of asphalt pavement should be taken once the asphalt layer is fully colled to its ambient temperature otherwise it can result in deformation of the cores and change its originaly properties like density, shape etc.
- Adequate water should be provided during the coring operation to avoid rise in the temperature of binder, which can result into the peripherial smearing of the cores and affect the compaction result of the asphalt.
Procedure:-
- For the freshly compacted asphalt materials, the core shall be taken when the material has had enough amount of time to cool to prevent damage to the core.
- To accelerate the Coring process, a cooling agent may be used.
- Connect the drill with the power supply and water unit agent.
- Place the coring machine such that the core bit is over the selected location.
- Adjust the level adjustment bolt at the bottom of the drill stand, so the bubble comes in the level indicator’s centre. This will keep the core bit perpendicular to the asphalt surface during the coring process.
- Then pump up the water using the water supply unit to aid in removing cuttings and minimising the heat generation due to friction.
- Continue the coring operation until the desired depth is achieved.
- Collect the cored specimen with the retrieval device.
- Measure the depth of the specimen using Vernier Caliper with the authorised personnel. Three or more measurements shall be taken of the sample and average thickness or depth to be measured of all samples recorded in the particular form for a further report or result procedure.

- The hole made from the coring operation shall be filled with a material that will not become dislodged.

Results or Report: –
Core thickness or depth shall be reported on standard authority forms with the following information.
- Date
- Core reference (chainage and offset distance)
- Layer description
- Material type
- Average thickness
More frequently asked questions: –
- What should the asphalt layer temperature be for asphalt coring?
- Who decides the location of asphalt coring?
- What should the spacing of the cores be for asphalt coring?
1) What should the asphalt layer temperature be for asphalt coring?
Ans: – Asphalt coring should not be carried out at high temperatures. As mentioned above, Asphalt coring should be carried out in the morning time, and the temperature should be lower than its ambient temperature for the newly laid asphalt layer. Usually, asphalt coring should not be carried out above 40°C temperature.
2) Who decides the location of asphalt coring?
In every road project, an authority or engineering team checks and approves the work quality. The representative of this authority monitors all the work operations from the beginning to the end. This representative can be an engineer or quality controller. Suppose the engineer or quality controller find any operation suspicious or not according to the normal standard. In that case, he can keep that in mind if he is not sure about the effect on work’s quality. During the testing, he can select such a suspicious location for the coring.
3) What should the spacing of the cores be for asphalt coring?
Ans: – Asphalt coring distance interval depends on several factors like project specification, instruction of authorized party, method statements, country codes etc, but normally it should be carried out at every 100m for single carriageways and 50m for dual carriageways. Some countries also stipulate a minimum of four coring in a km. The authorized engineer of the project is allowed to increase the number of testing. But, if those numbers go beyond the project specification and the cores do not fail under testing, the road contractor can claim for the extra tests.


Pingback: How to perform a concrete core cut | Everything you need to know
When the corecut test is conducted on resurfaced asphalt concrete, in some of the roads it was found that the old surface is also cut along with the new surface. It is sometimes hard to differentiate between the two. How do we do it? moreover in some places, even though the core cut is done in much deeper depth than the actual new surface, we could see the new surface comes out leaving the old surface. Is it because the bitumen used is too soft or the compaction is not done properly?
Hi! Thank you very much for contacting us. I am overjoyed that people are reading my writings and allowing me to communicate with them. You may subscribe to me on YouTube at http://www.youtube.com/@MadAboutConstruction. Now, let’s get to your questions.
1) When the corecut test is conducted on resurfaced asphalt concrete, in some of the roads it was found that the old surface is also cut along with the new surface. It is sometimes hard to differentiate between the two. How do we do it?
Ans: When we condense a new layer on top of an existing layer, it always creates a very small separation line between the old and new layers, and you can also see a colour difference between the old and new layers. Both layers’ qualities will differ if they are tested in a laboratory.
2) moreover in some places, even though the core cut is done in much deeper depth than the actual new surface, we could see the new surface comes out leaving the old surface. Is it because the bitumen used is too soft or the compaction is not done properly?
Ans: There could be various reasons for this. For example, before placing a new layer, dirt would adhere to the existing surface. Before placing new layer, a prime coat, tack coat, or any other surfacing layer may be applied for proper bonding and attachment however the old and new layers became separated due to disturbance during or after core cutting.
what is the procedure taken after the core fail on the first time !
Generally, the Engineer supervises the work while executing the work; when he sees that a particular area’s workmanship has been compromised, he asks to carry out the test around that area. BoQ allows the Engineer to instruct the contractor to carry out the test. If that test fails, the Engineer can ask the contractor to do more tests in the surrounding area to identify the extent of the area failed in testing. This test helps engineers to get the idea of faulty or defective work. In such a scenario, the Engineer asks the contractor to propose the remedies which can be most effective and satisfy the Engineer and local standard requirements. In some projects, the contractor must compile the methodology of remedial work during the tender stage if the core test fails.
Why 100 mm core bit why not 150mm
100mm is the optimum size, which is near the thickness of the asphalt layer. If your asphalt thickness is 40 and you do coring of 150, the edges may get damaged due to abrupt due to more impact length. Similar, if you reduce core dia to 75 or 50mm, The top and bottom parts can get separated from the sample.
The thumb rule to keep in mind is to choose the dia of the core drill bit according to the depth of the asphalt layer to avoid the sample disturbance, as asphalt does not get strong like concrete.
Sir, what is the maximum time periodt to conduct core test in asphalt road , please inform
That should be done immediately once the asphalt layer has fully cooled to ambient temperatures. You will get the best result in thickness, porosity, strength etc. Leaving road open for the vehicle can affect its density due to accessive compaction and also affect its thickness. The test needs to be done as per the standards and standards neither allows less nor more compaction?
I would like to have a sample report on the Asphalt Coring Test on a new pavement.
We will definitely share the sample report very shortly and revise this article with a sample report.