
Do you want to set Limits in AutoCAD?
This article will break it all down to answer the ultimate question: How to set Limits in AutoCAD? We’ll also tell you what is Limits in AutoCAD and the importance of setting limits.
What is the Limits in AutoCAD?
Limits set the invisible rectangular boundary in the drawing area to limit clicking, entering point locations, and limiting grid display.
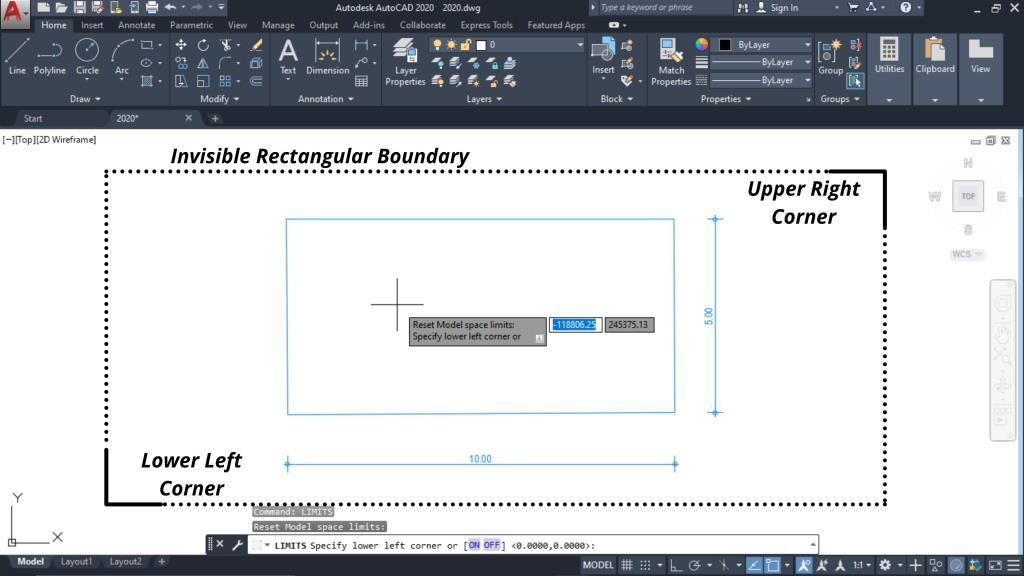
Lower Left Corner (LLC) and Upper Right Corner (URC) are two points you have to decide so they can cover the whole drawing (with extra space) you are planning to draw. These points are invisible and they create invisible rectangular or square boundaries. If you choose Lower Left Corner Value (0,0) and Upper Right Corner Value (1000,1000), it will create an invisible rectangular boundary. So basically, it depends on the value of LLC and URC.
In the above image, my plot area is 10m X 5m. In this case, I can insert the value of any point as LLC, but the URC value needs to cover my whole plot with extra space. Suppose I choose (0,0) as my Lower Left Corner (LLC); I must choose (10,5) or higher as my Upper Right Corner (URC). LLC (0,0) and URC (10,5) means I won’t get any extra space. Here I insert value in meters. If you are drawing this same drawing in mm, LLC and URC will be (0,0) and (10000,5000) subsequently.
LIMCHECK value is another key command related to LIMITS. If you turn on (change LIMCHECK value to 1), the user can not draw anything outside the defined limits. Users can move or copy objects or elements anywhere on the drawing but can not create new ones outside the limits. If users want to draw objects or elements outside the limits (after setting limits), they need to reset the limits to cover more area or turn off LIMCHECK (change LIMCHECK value to 0).
Importance of Limits in AutoCAD?
You can control your drawing. If you zoom in and out in the drawing area and want to refocus on your drawing, you can use the ZL command. You can avoid drawing outside the Limits by turning on LIMCHECK.
How to set Limits in AutoCAD?
- Enter command LIMITS and press enter.
- Insert the value of the Lower Left Corner and press enter. Users can enter the coordinate value or click in the drawing area to insert that particular point’s value.
- Insert the value of the Upper Right Corner and press enter. Users can insert this value similarly by inserting coordinates or clicking in the drawing area.
- As explained above, these two points will define an invisible rectangular boundary in the drawing.
What is Dynamic Input in AutoCAD?
How to zoom to limits in AutoCAD?
- Once you set the limits mentioned above, enter command ZL and press Enter. This will focus or zoom to limits you have set, but to enable ZL command, make sure you have created AutoLISP and loaded it in your AutoCAD as mentioned below.
How to Create and Load AutoLISP to zoom-to-limits (ZL) command?
- Open notepad on your computer. (Check below Note if you want to download LSP file directly)
- Paste below code in notepad.
(defun C:ZL (); Zoom Limits
(command “_.’zoom” (getvar ‘limmin) (getvar ‘limmax))
(princ)
)
- Save notepad file anywhere on your computer with .LSP extension at the end of file name with any file name. For example, Zoom-To-Limits.LSP.
- Open AutoCAD.
- Enter command AP or APPLOAD and press Enter.
- Choose the Location of .LSP file from the Look in the dropdown list in Load/Unload Applications dialogue box.
- Select .LSP file and Click on Load.
- Click on Close once you see the .LSP file Successfully loaded message.
Note: You can click on the below LSP icon and download this AutoLISP if you want. Once you complete downloading, extract the file and follow above steps 4 and 8.

If you have any issues with the procedure, please feel free to reach out to me using the Whatsapp button How may I help you? Below or by using the comment box.
Pingback: What is Ribbon in AutoCAD? How to Hide or Unhide Ribbon?